Prerequisites
1. Git
Please follow the installation instructions here for further details about installing git.
2. Nodejs
Please follow the installation instructions here for further details about installing nodejs.
3. Averos Backend Mock
Please make sur you have installed
GitandNodeJSbefore installingAveros Backend Mock.
Though it is not always the case especially with monolithic applications, but usually Information Technology Applications, at the highest level, are composed of frontend interfaces that interacts with backend services.
Of course these two layers could be subject to further decompositions; but the grouping category still remains the same: a component either belongs to a frontend category or is part of a backend category.
Still, how can we identify both contexts ?
Long story short; everything that is directly exposed to Humains belongs to the frontend category; and everything that is not exposed to Humains and which directly interacts with the lowest systems (ex. databases) fall under the backend category.
Now, this definition is the easiest one a citizen developer could grasp and you may find advanced definitions somewhere else but let’s not complicate our lifes any further just yet.
So, feel free to delve deep into the application architecture topic if you want to know more about it; but what you have just learnt is more than enough to successfully carry out this tutorial.
Let’s get back to our application; shall we ?
In light of the preceding, note that the current averos framework version will provide you nocode visual tools so that you create frontend applications and ONLY frontend applications.
Future averos version may include additional tools that provides backend services.
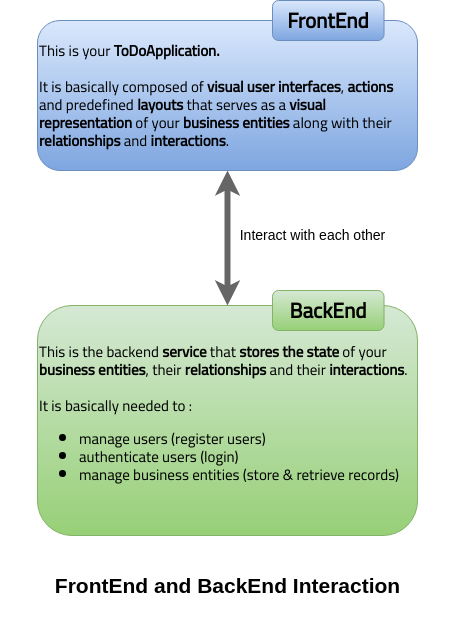
Below is the high level architecture that depicts your averos application as a frontend application, the backend service as well as their interactions.
As a result, your application will need a service that handles authentication, user management and business entities management.
These are not, and should not, be managed by averos applications. They should be managed by external services.
That’s why we created a backend service mock named averos backend mock that you will use with your application so that you could be able to experience with your frontend application that you are going to create.
Averos backend mock will provide you basic backend functionnalities such as, authentication, user management and business entities management.
🔖 Please note that averos backend mock is only made for testing purposes and thus is not intended to be used in production.
If you are willing to use your application in production, you have to use ready for production backend services.
Backend services could be either developed from scratch or created on the cloud using for example google functions, aws lambda or azure functions.
Now, let’s go ahead and install and run averos backend mock locally by following these steps:
- Open a command line
- Windows users: Click Start → All Programs → Accessories → click on
Command Prompt - Mac users: Click the
Launchpad iconin the Dock → typeTerminalin the search field → then clickTerminal - Linux users: Open a shell command line (but you already know how to procede, don’t you ?)
- Windows users: Click Start → All Programs → Accessories → click on
- copy/paste the following command into the
terminalthe hitenter:git clone https://github.com/averos-io/averos-backend-mock && cd averos-backend-mock && npm install && npm startIf you have already executed the previous command and you want to run the backend mock once again, just execute the following command using a
terminalfrom withinaveros-backend-mockhome folder :npm start - Wait until the service starts. Leave the service up and do not close the window. (closing the terminal window will shutdown the service)
If everything went ok you shall see an output similar to the following:
🎉🎉🎉 Congratulations! Your service backend is up and running ! 🎉🎉🎉
Let’s start creating our application!
Before starting to create our application we first have to look at the business requirements and see what are the capablities and features that we are going to implement in our application.
Once the application requirements are defined, we will move on to the design step where we will specify our application in a design close to UML Language using Averos Designer, then finally generate it.
These topics will be explained in the next sections.

